
所需依赖
如何你的项目是H5项目且图片是在阿里云的OSS上那么你需要对OSS设置跨域方案,可以参考:
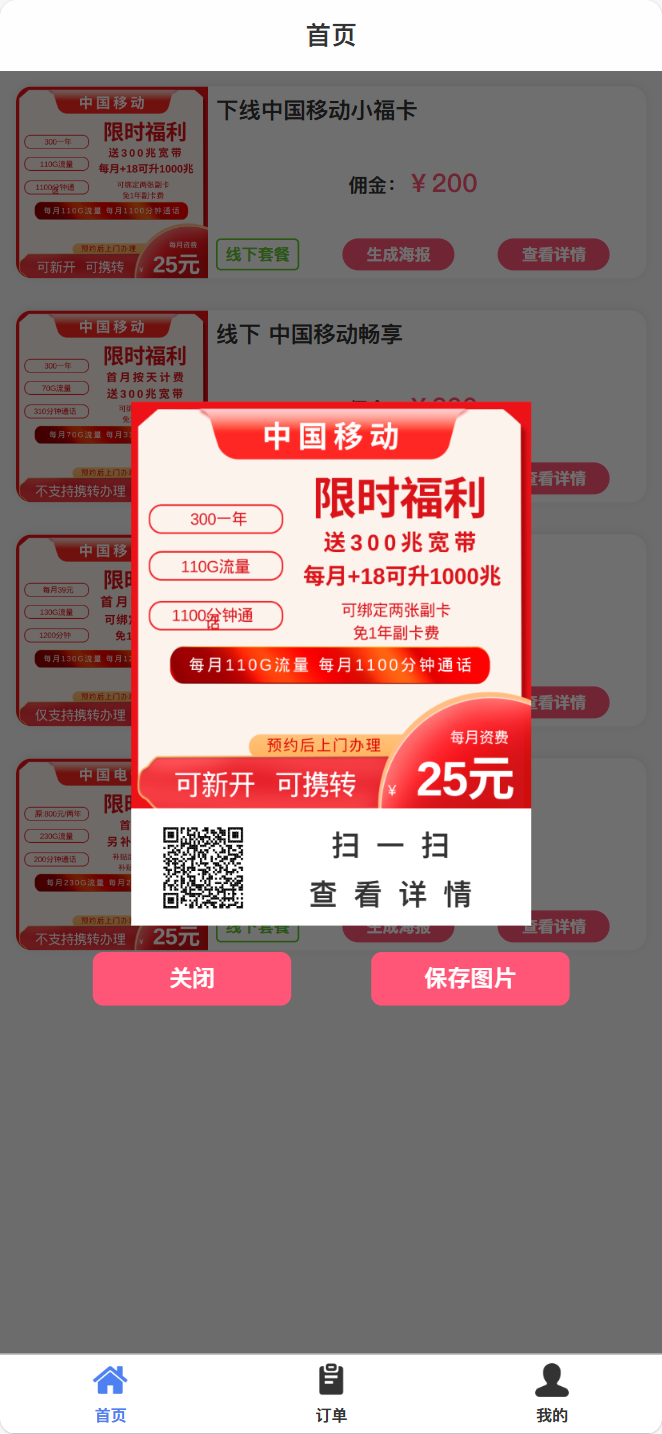
简介
海报生成组件目前仅用于安卓APP和H5页面当中使用,其他端没测试过,不确定好不好使
APP和H5的代码中,只有保存的代码有不同,海报生成的原理是一样的,使用html2canvas依赖把html节点变成一个图片
APP使用uni.saveImageToPhotosAlbum就可以将图片保存至手机相册内,所以APP端的流程是最完整的,点击生成海报后会自动生成图片自动保存图片。但是uni.saveImageToPhotosAlbum不支持H5,所以H5保存图片使用了一个曲线救国的方式(用户长按图片触发浏览器的保存图片)进行保存
Props:bgimg:海报背景图
Props:qrcode:二维码链接
Event:@finsh:海报生成保存完成后或用户点击组件内的关闭按钮时触发@finsh在使用时,想要对海报内容进行修改时请修改
#pagePoster的子元素
完整代码
<!-- 为了解决在安卓手机(或部分手机)中生成画布后里面的图片模糊问题,那么建议将该页面所有的 image 标签改为 img 标签,这样兼容性会更好些! -->
<template>
	<view class="html2Canvas">
		<!-- 需要生成图片的模板 -->
		<!-- #ifdef H5 -->
		<view class="canvas-module" v-if="!posterUrl" id="pagePoster">
			<img :src="bgimg" alt="">
			<view class="detail">
				<view class="qrcode">
					<ikun-qrcode width="50" height="50" unit="px" color="#000000" :data="qrcode" />
				</view>
				<view class="text">
					扫一扫<br>查看详情
				</view>
			</view>
		</view>
		<view class="posterImg" v-if=" posterUrl">
			<img v-if=" posterUrl" :src="posterUrl" />
		</view>
		<!-- #endif -->
		<!-- #ifdef APP -->
		<view class="canvas-module" id="pagePoster">
			<img :src="bgimg" alt="">
			<view class="detail">
				<view class="qrcode">
					<ikun-qrcode width="50" height="50" unit="px" color="#000000" :data="qrcode" />
				</view>
				<view class="text">
					扫一扫<br>查看详情
				</view>
			</view>
		</view>
		<!-- #endif -->
		<view class="btnGroup">
			<view class="generate-image" @click="cancle">关闭</view>
			<view class="generate-image" @click="canvasImage.generateImage">保存图片</view>
		</view>
	</view>
</template>

<script>
	import {
		pathToBase64,
		base64ToPath
	} from 'image-tools';

	export default {
		name: "poster",
		props: ["bgimg", "qrcode"],
		data() {
			return {
				posterUrl: '', // 生成画布的图片
				userImage: '', // 本地头像图片
				cancleBtn: true,
				bg: "",
			};
		},
		created() {
			this.turnBase64Image(this.bgimg, 'bg');
		},

		methods: {
			cancle() {
				if (this.cancleBtn) {
					this.$emit("finsh")
				}
			},
			/* 将base64 位的图片路径转换为 临时路径 */
			loadBase64Url() {
				const imageStr = this.posterUrl;
				base64ToPath(imageStr)
					.then(path => {
						console.log("临时路径", path)
						this.saveImage(path);
					})
					.catch(error => {
						console.error('临时路径转换出错了:', error);
					});
			},

			// 保存图片到手机相册
			saveImage(filePath) {
				uni.saveImageToPhotosAlbum({
					filePath, // 需要临时文件路径,base64无法保存
					success: () => {
						this._showToast('保存图片成功');
						this.cancleBtn = true;
						this.cancle()
					},
					fail: () => {
						this._showToast('保存失败,请重试');
					}
				});
			},

			// 将图片转为base 64 位url
			turnBase64Image(img, key) {
				uni.getImageInfo({
					src: img,
					success: image => {
						pathToBase64(image.path)
							.then(base64 => {
								this[key] = base64;
							})
							.catch(error => {
								console.log('转换失败:', error);
							});
					},
					fail: err => {
						console.log('将本地图片转为base 64报错:', err);
					}
				});
			},

			// 获取生成的base64 图片路径
			receiveRenderData(val) {
				this.posterUrl = val.replace(/[\r\n]/g, ''); // 去除base64位中的空格
				// #// #ifdef H5
				this._hideLoading()
				this.cancleBtn = true;
				// #endif
				//#// #ifdef APP
				this.loadBase64Url()
				// #endif
			},

			// 显示loading
			_showLoading(str) {
				this.posterUrl = '';
				uni.showLoading({
					title: str
				});
			},

			// 隐藏loading
			_hideLoading() {
				uni.hideLoading();

				// #ifdef H5
				this._showToast('长按保存图片');
				// #endif
			},

			// 报错alert
			_errAlert(content) {
				uni.showModal({
					title: '提示',
					content: content
				});
			},

			// 提示弹窗
			_showToast(msg) {
				uni.showToast({
					title: msg,
					icon: 'none'
				});
			},
			disableCancle() {
				this.cancleBtn = false
			},
		}
	};
</script>

<script lang="renderjs" module="canvasImage">
	import html2canvas from 'html2canvas'
	export default {
		methods: {
			// 生成图片需要调用的方法
			generateImage(e, ownerFun) {
				ownerFun.callMethod('disableCancle')
				ownerFun.callMethod('_showLoading', '正在生成图片') // 生成图片的 loading 提示
				setTimeout(() => {
					const dom = document.getElementById('pagePoster') // 需要生成图片内容的 dom 节点
					html2canvas(dom, {
						width: dom.clientWidth, //dom 原始宽度
						height: dom.clientHeight,
						scrollY: 0, // html2canvas默认绘制视图内的页面,需要把scrollY,scrollX设置为0
						scrollX: 0,
						useCORS: true, //支持跨域
						// scale: 2, // 设置生成图片的像素比例,默认是1,如果生成的图片模糊的话可以开启该配置项
					}).then((canvas) => {
						// 生成成功
						// html2canvas 生成成功的图片链接需要转成 base64位的url
						ownerFun.callMethod('receiveRenderData', canvas.toDataURL('image/png'))
					}).catch(err => {
						// 生成失败 弹出提示弹窗
						ownerFun.callMethod('_errAlert', `【生成图片失败,请重试】${err}`)
					})
				}, 300)
			}
		}
	}
</script>


<style lang="scss" scoped>
	* {
		margin: 0;
		padding: 0;
	}

	image,
	img {
		width: 100%;
		height: 100%;
	}

	.html2Canvas {
		position: fixed;
		top: 0;
		left: 0;
		width: 100vw;
		height: 100vh;
		background-color: #00000090;
		display: flex;
		flex-direction: column;
		justify-content: center;
		align-items: center;

		.canvas-module {
			width: 250px;
			position: relative;

			img {
				width: 250px;
				height: 250px;
			}

			.detail {
				width: 250px;
				height: 70px;
				background-color: white;
				margin-top: -4px;
				display: flex;
				flex-direction: row;
				align-items: center;
				box-sizing: border-box;
				padding: 0 20px;

				.qrcode {
					width: 40%;
				}

				.text {
					text-align: center;
					width: 60%;
					display: flex;
					justify-content: center;
					align-items: center;
					line-height: 30px;
					font-size: 18px;
					letter-spacing: 10px;
				}
			}

		}

		.posterImg {
			width: 250px !important;
		}

		.btnGroup {
			display: flex;
			flex-direction: row;
			width: 80%;
			gap: 5%;

			.generate-image {
				width: 45%;
				height: 60rpx;
				margin: 30rpx 30rpx;
				background-color: #ff5678;
				font-size: 26rpx;
				color: #fff;
				display: flex;
				align-items: center;
				justify-content: center;
				border-radius: 12rpx;
			}
		}

	}
</style>
使用方法
<template>
	<view id="PageMain">
		<button class="btn" @click="share()">生成海报</button>
		<poster v-if="posterVisible" :bgimg="posterBgimg" :qrcode="posterQrcode" @finsh="posterFinsh"></poster>
	</view>
</template>

<script>
	export default {
		data() {
			return {
				posterVisible: false,
				posterBgimg: "",
				posterQrcode: "",
			}
		},
		methods: {
			posterFinsh() {
				this.posterVisible = false
			},
			share() {
				this.posterVisible = true
				this.posterBgimg = 'https://file.hc8.ren/1715181985507743800.png'
				this.posterQrcode = 'https://file.hc8.ren/1715181985507743800.png'
			},
		}

	}
</script>

<style lang="less" scoped>
</style>